Vacuum forming is used to make plastic housing or components for a wide range of items, from food packaging and masks to helmets and parts for aeroplanes.
Let's take a look at how it's done.
Before we get started here's what you'll need:
MDF or similar material to make your mould
Access to a vacuum former
Some sandpaper
A release agent or furniture polish
Goggles, apron and a dust mask.
And for finishing you'll need a mould cutter or jig saw, as well as a sanding board and wet and dry paper.
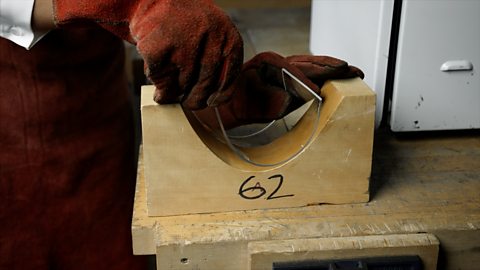
The first step is to make an MDF mould or pattern which will be used to shape the plastic.
Your mould will need a few features to work best.
Firstly, it should have a flat base so that it can sit on the platen of the vacuum former. There should be no undercuts so that it can be easily removed from the formed plastic.
Always make sure that any recesses or grooves have a pattern of small holes drilled around the edges. This ensures that the plastic is sucked into the mould rather than being draped across the surface.
Most importantly, the mould needs to have a draft angle, which is an angle or slope of typically 5 to 10 degrees. The draft angle ensures that the mould can be easily removed.
And finally, the surface of the mould needs to be sanded smooth to resist sticking. It can also help if you coat the surface with a release agent or furniture polish.
Now, you can place your finished mould onto the platen in the base of the vacuum former and lower the platen into the machine.
Clamp your thermoplastic sheet onto the seal.
Make sure that the sheet sits on the seal all the way around and that the clamp presses the plastic sheet evenly on to the seal.
Once that's in place, you can turn on the heaters and slide them over the plastic sheet.
At first the plastic will warp as it warms, then sag slightly and then pull tight as it reaches the right temperature and softness.
Now you can turn off the heaters and slide off the lid.
Next, raise the platen with the mould on top, which will press the mould into the soft plastic.
Activate the vacuum pump to evacuate the air, creating the atmospheric pressure which will form the plastic around your mould.
After 30 to 60 seconds, turn off the vacuum. If your machine has a reverse air-flow button, use it now as it will force air back into the mould and help to break the contact between the mould and your plastic component.
And now it's time to trim and finish your plastic item using a combination of a mould cutter, sand paper or sanding board, plastic scrapers, and wet and dry paper.
Video summary
This short film explains the process of vacuum forming, which is an easy way to make hollow plastic mouldings which can be used in a wide variety of RMT design projects.
Teacher Notes
Points for discussion
What are the important things to look out for in creating the design of the mould or pattern? For example:
- No undercuts
- An appropriate ‘draft angle’ on the mould/pattern. Why?
- Suitable materials
What happens to the plastic before, during and after heating? This can lead onto a discussion of thermoplastic polymer chains and how they can be reshaped and reused, sustainability and issues related to recycling plastics, what happens to plastic waste leftover from the mouldings, etc.
What type of products and components is this process most useful for?
How can vacuum forming be used in prototyping and in the iterative design development of a new product?
What are the pros and cons of vacuum forming compared to other plastic forming methods? For example, drape forming, line bending, etc. Why might vacuum forming be selected over these as the best process for a particular component?
Suggested activities
This process can be used for a whole range of design and make projects. Ideas might include:
- Creating the body shell for a streamlined racing car. The chassis could be made from softwood, using standard wheels and welding wire as axles.
- Making the housing for a clock mechanism. The mould can be made from MDF to hold a standard AA battery clock mechanism. The clock face part of the mould could be retained and a graphic applied to it for the final product.
- Making small compartments for a wooden jewellery or trinket box.
- Creating a recessed desk tidy for homework stationery.
- As this process can be used for making components, it can be used in a wide range of KS4 design and make projects.
Suitable for teaching design and technology (D&T) at KS3/KS4 in England, Wales and Northern Ireland, and 3rd/4th levels in Scotland.
Laminating wood. video
This short film explains the process of laminating thin, flexible layers of wood to form a stiff, usable shape.
Line bending. video
This short film explains the process of line bending, which is a technique used to make precise folds in plastic components.
Drape forming. video
This short film explains the process of drape forming, which is used to create curved or more complex shapes out of plastic.