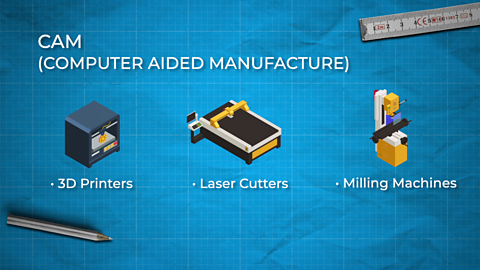
Manufacturing
Tools and Processes
Manufacturing workshops provide access to a wide range of tools and machines to manufacture products. Workshop tools and machines, used safely, can be used to mark, cut, shape, form and finish materials to a high standard.
TOOLS AND PROCESSES
TITLE:
Tech Bitez
MUSIC
ANIMATION SEQUENCE
Learning outcomes
STUDIO SEQUENCE
*Joe and Sandy in workshop *
JOE
Hello and welcome to Tech Bitez. We have a great show in store for you today. So I’ve started to clear out the workshop and I realised I have far too many tools, like who needs four different types of saw?
SANDY
There are, of course, more than four types of saw, but four is a good start. It all depends on what you're trying
to cut.
JOE
Yeah, but if it's sharp enough, isn't one saw enough?
SANDY
Is it any wonder you couldn't saw anything in a straight line. These are the four main types of saw that I assume you found in the workshop.
ANIMATION SEQUENCE
Animated section about tools and processes
SANDY
A tenon saw. Mainly used for cutting straight lines with accuracy. They are used to cut wood, both hardwoods and softwoods. A coping saw. Used for cutting thinner pieces of material and can even deal with cutting curves. They can be used to cut metals, plastics and wood. A scroll saw is often used to cut intricate patterns or shapes when required. It can also be used to cut metals, plastics and wood. Lastly, there is the hacksaw and even a junior hacksaw. These are most commonly used to cut thin pieces of metal or plastic. So you see, each one has its place in the workshop.
STUDIO SEQUENCE
Joe and Sandy in workshop
JOE
Okay, I guess that makes sense. There's no way any three drills, though, right?
SANDY
To be honest, Joe, I wouldn't trust you with even one drill. But yes, I think any good workshop needs a number of different drills.
ANIMATION SEQUENCE
Animated section about materials
SANDY
A pillar drill. This is the biggest and probably most commonly used drill in the workshop. It can be used on a range of materials and is very accurate. A cordless drill is another very common drill. It can be used in a range of different materials and is made to be easily moved. Lastly, there is the hand drill. Hand drills are powered by turning the handle on the side. This means you have a lot more control over the speed of the drill. However, it requires a lot more effort than the others. You may also have noticed a small desktop drill that can be used for drilling holes into PCBs.
STUDIO SEQUENCE
Joe and Sandy in workshop
JOE
Okay, fine. I'll keep all the drills too. I can see why some drills are better suited for certain jobs. Are all the drill bits necessarily though?
SANDY
How can you still not get this? You need them all. They are there for a reason.
ANIMATION SEQUENCE
Animated section about materials
SANDY
A flat bit is used to make small to medium sized holes in a range of materials. To make a bigger hole a forsner bit is more commonly used. A countersunk bit is another commonly used drill bit. This drill bit leaves space for a flathead screw to remain flush with the material. Lastly, you have the hole saw that this bit allows a user to bore out a circular hole of wider diameter than most standard bits would typically create.
STUDIO SEQUENCE
Joe and Sandy in workshop
JOE
Ach aye I get it now. So all the different tools have their specific use and I need access to them all, to do the job properly.
Tools for woodwork - marking out, cutting, shaping
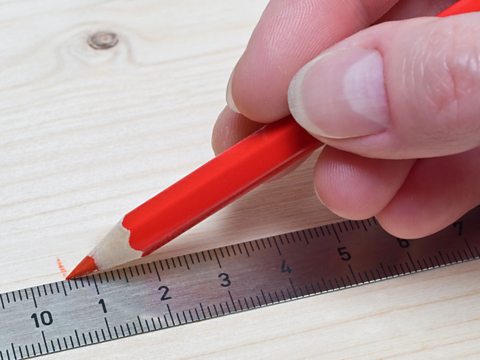
300mm Steel rule
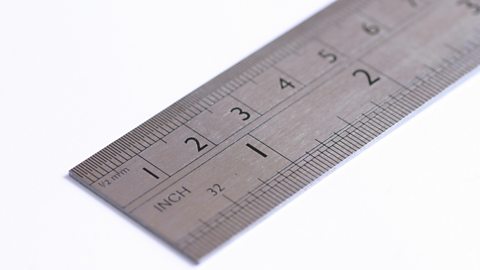
Used for general measuring and marking out.
Try Square
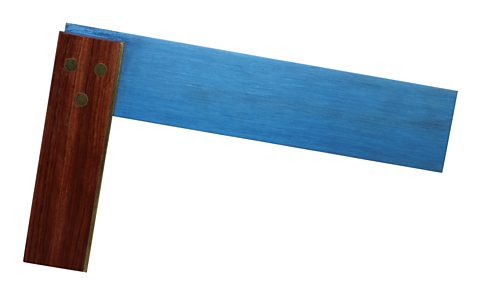
Used for marking lines at right angles to an edge on wood. Can also be used to check for ‘squareness’
Bench Hook
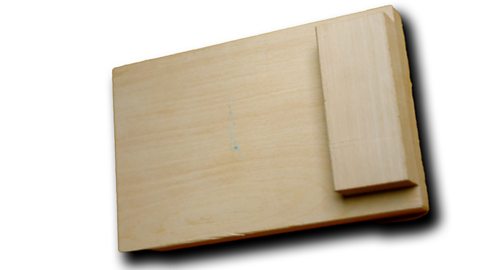
Used with the woodworking vice and the tenon saw when cutting wood. A bench hook enables a piece of wood to be held firmly in position during cutting.
Marking Gauge
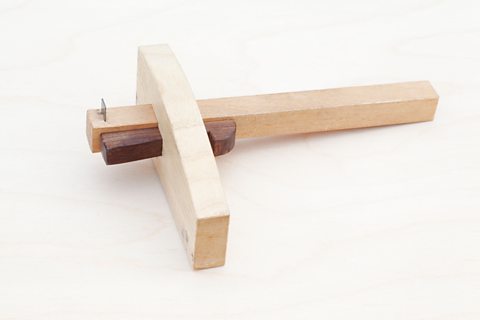
Used to mark lines parallel to an edge on wood.
Tenon Saw
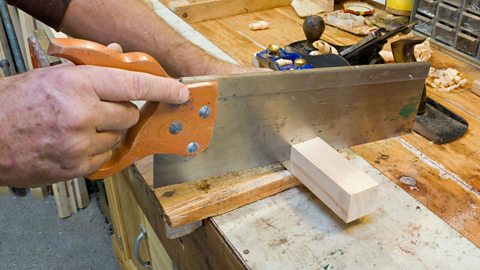
Used for cutting straight lines in wood, also used for cutting wood joints.
Coping Saw
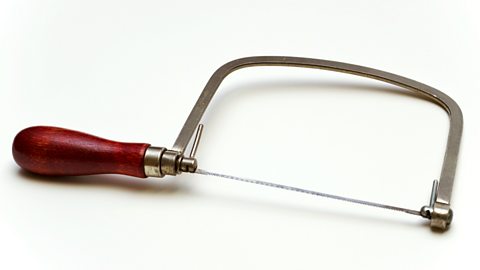
Used for cutting curves in wood and plastic.
Tools for Metalwork - marking out, cutting, shaping
300mm Steel rule
Used for general measuring and marking out.
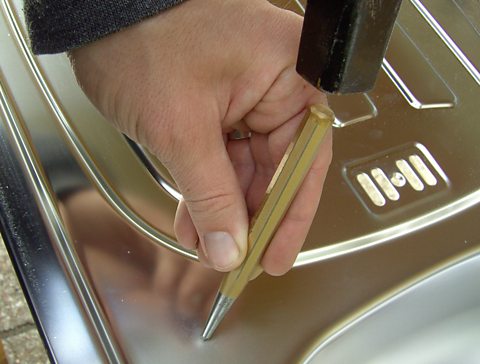
Scriber
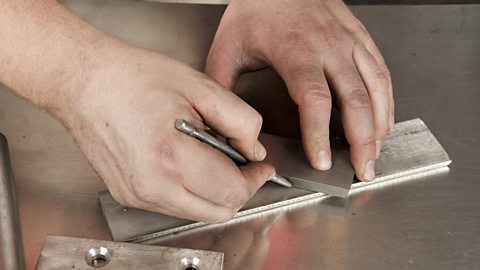
Used for marking out on metal, sometimes used with ‘marking blue’ to make the marks easier to see. Marking blue coats the metal and is scratched off with the scriber
Centre punch
Used on metal to mark the position of a hole to be drilled. This then prevents the drill from slipping.
Files
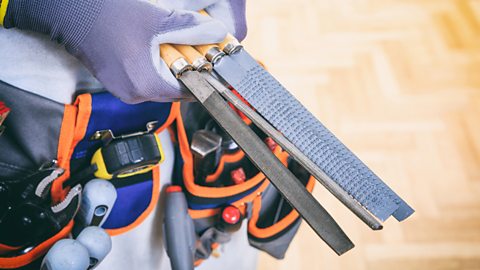
Used for shaping and removing waste material on metals and plastics. Available in a variety of shapes.
Hacksaw
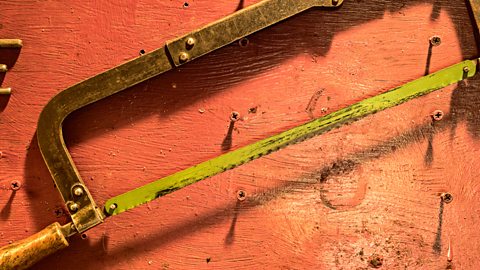
Used for cutting straight lines in metal.
Junior hacksaw
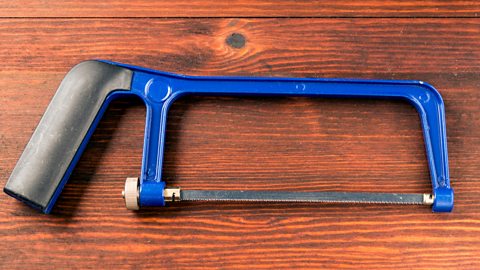
A smaller version of a hacksaw, used in enclosed spaces, precise cuts and for smaller pieces of metal.
Workshop machines
Bandfacer
Pillar drill
Polisher
Vacuum Forming
This video explains the processes involved with Vacuum Forming, the easiest way to make hollow plastic mouldings which can be used in a wide variety of RMT design/make projects.
Vacuum forming is used to make plastic housing or components for a wide range of items, from food packaging and masks to helmets and parts for aeroplanes.
Let's take a look at how it's done.
Before we get started here's what you'll need:
MDF or similar material to make your mould
Access to a vacuum former
Some sandpaper
A release agent or furniture polish
Goggles, apron and a dust mask.
And for finishing you'll need a mould cutter or jig saw, as well as a sanding board and wet and dry paper.
The first step is to make an MDF mould or pattern which will be used to shape the plastic.
Your mould will need a few features to work best.
Firstly, it should have a flat base so that it can sit on the platen of the vacuum former. There should be no undercuts so that it can be easily removed from the formed plastic.
Always make sure that any recesses or grooves have a pattern of small holes drilled around the edges. This ensures that the plastic is sucked into the mould rather than being draped across the surface.
Most importantly, the mould needs to have a draft angle, which is an angle or slope of typically 5 to 10 degrees. The draft angle ensures that the mould can be easily removed.
And finally, the surface of the mould needs to be sanded smooth to resist sticking. It can also help if you coat the surface with a release agent or furniture polish.
Now, you can place your finished mould onto the platen in the base of the vacuum former and lower the platen into the machine.
Clamp your thermoplastic sheet onto the seal.
Make sure that the sheet sits on the seal all the way around and that the clamp presses the plastic sheet evenly on to the seal.
Once that's in place, you can turn on the heaters and slide them over the plastic sheet.
At first the plastic will warp as it warms, then sag slightly and then pull tight as it reaches the right temperature and softness.
Now you can turn off the heaters and slide off the lid.
Next, raise the platen with the mould on top, which will press the mould into the soft plastic.
Activate the vacuum pump to evacuate the air, creating the atmospheric pressure which will form the plastic around your mould.
After 30 to 60 seconds, turn off the vacuum. If your machine has a reverse air-flow button, use it now as it will force air back into the mould and help to break the contact between the mould and your plastic component.
And now it's time to trim and finish your plastic item using a combination of a mould cutter, sand paper or sanding board, plastic scrapers, and wet and dry paper.
- Lower mould into vacuum former.
- Heat the plastic until soft.
- Bring the mould up into the plastic using the lever.
- Switch on the vacuum to suck out all the air.
- Switch off vacuum and remove the plastic.
- Remove moulds – cut away excess plastic.
Sometimes talc can be dusted on the A hollow container used to give shape to molten materials. to help it drop out with ease. A good vacuum-formed product will only be possible if a good mould has first been made. The mould must have a draft angle, so it doesn’t get stuck in the plastic. A draft angle is a slant that on each side of a vacuum moulded part. This helps with releasing the part from the mould.
Line Bending
A line bender has a heated wire that provides heat, concentrated to just a few millimetres wide. The wire heats plastics along a line so they can be bent. Once the plastic softens, it can be bent easily into shape around a A solid shape that is often used to make a mould before being left to cool.
Line bending is a technique used to make precise folds in plastic components. The process is demonstrated using a strip heater and a hot wire line bender. Acrylic is used in this demonstration but the process can be used for a variety of thermoplastics.
Line bending is used to make straight, precise folds in plastic components. Items like mobile phone stands are made using this process.
Before we get started here's what you'll need:
A sheet of plastic, usually acrylic is best
Access to a hotwire heater or strip heater
And a right angle or adjustable jig.
Cut the plastic sheet to the size and shape you need for your design. If you are using a CAD/CAM method then use a laser cutter. But you can also use a jig saw or coping saw and sand and finish the edges.
There are a few different options for heating plastic to bending point.
For this example, we are using a hot wire heater, but the process is the same for a strip heater.
Set the hot wire heater to the correct temperature for the type and thickness of your plastic. Acrylic like this softens at 160 degrees Celsius, but high impact polystyrene would soften at 80 to 90 degrees.
Heat the plastic until it bends easily in your fingers.
If the plastic is over 6mm thick, it will require a cooler wire and a longer heating time and will need be turned during heating to ensure that it doesn't burn.
Using an appropriate angle or adjustable jig, hold the plastic at your desired angle until its cool.
Our 3mm thick sheet will need to be held in position for two minutes, but thicker plastics would need to be held for longer.
In general, you'll need about two minutes for every three millimetres of thickness.
Once it's cooled, then you're ready to finish your plastic product.
Check out the 'Explain This… Finishing plastic' in this series for more detail.
Metal Folding
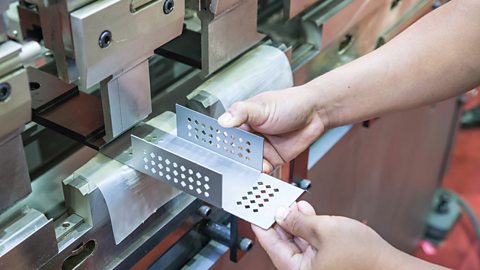
Sheet metal can be easily bent using a manual folding machine also known as a ‘Box Pan Folder’. The piece of sheet metal is first clamped into position. The user then pushes the handle upwards, and the sheet metal is shaped to the required angle.
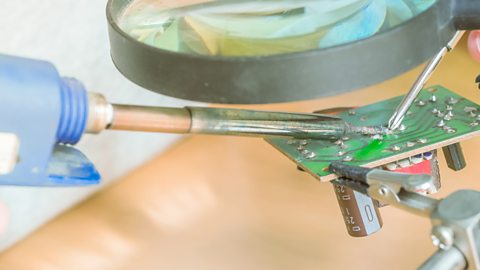
Soldering
How to solder
Soldering is a way to join metal parts, often electrical components, by heating a filler metal called solder until it melts. When the solder cools, it fuses the components together.
- All components must be clean and grease free.
- Heat both parts of the joint to 200°C with a hot soldering iron - for at least 10 seconds.
- Apply the solder, allowing it to run into the joint.
- Allow it to cool without movement of the joint.
- Use a heat sink when soldering diodes and transistors.
Safe soldering
- Never touch the tip of the soldering iron. They are very hot and will give you a nasty burn
- Take great care to avoid touching the mains flex with the tip of the iron. An ordinary plastic flex will melt immediately if touched by a hot iron and there is a serious risk of burns and electric shock.
- Always return the soldering iron to its stand when not in use. Never put it down on your workbench, even for a moment!
- Work in a well-ventilated area. The smoke formed as you melt solder is mostly from the a chemical that helps clean the surfaces to be soldered and helps the molten solder flow and can be quite irritating.
Finishing materials
Finishes are usually applied to products for two reasons, firstly to protect them (e.g. from rusting/rotting), secondly to make them look more refers to the way a product looks and feels, especially in a pleasing manner pleasing.
The table below outlines the different finishes that can be applied to each type of material.
| Wood | metal | plastic | |
|---|---|---|---|
| paint | ✔ | ✔ | |
| polish | ✔ | ✔ | |
| plastic Heated metal is dipped into powdered or a liquid plastic so that a coating of this plastic is bonded to the metal | ✔ | ||
| galvanising | ✔ | ||
| varnish | ✔ | ||
| oil | ✔ |
Finishing Metal
It's important to treat the surface of components made from metal to stop them changing colour and becoming damaged. Aluminium will oxidise, turning the surface grey rather than shiny; steel will rust; and copper will also oxidise and turn turquoise in colour.
Before you get started here are some things you'll need depending on the finish you want to achieve:
Some lacquer
Various grades of emery cloth and wire wool
Red oxide
Primer and paint
Plastic powder
And some hotwork gloves, apron, goggles and a dust mask.
Copper and aluminium are usually lacquered to prevent their surfaces oxidising and to preserve their aesthetics.
Steel can be lacquered too, but you can also get some really great finishes using other techniques.
Always start by removing any oxidisation or scale from the surface of the steel. You might need to use a grinder for this, but a combination of emery cloth and wire wool should prepare most surfaces ready for finishing.
Before applying any finishes, always make sure the surface is dry and free from oil or moisture.
Painting steel works well and you can choose whatever colour you want for your finish.
Begin by painting the metal with red oxide paint to prevent it rusting.
Once the surface is dry, you can apply a primer or go straight to painting. You can use brushes or aerosol sprays. Just be sure to use your mask for those.
Another option is to apply a plastic coating to your steel. To do this, you'll need to melt a plastic powder onto the surface of the steel.
It's important that you don't touch the plastic powder or the surface of the metal throughout this process, so you'll need to drill a hole in your component so you can hang it on a wire hook.
One option is to heat the metal component in an oven first. The oven should be set to 160 degrees centigrade and your metal component will need to stay in for five to ten minutes.
Once the steel is up to temperature, leave it in for a few extra minutes to ensure that its heated evenly with no cooler spots.
Now use your hook to remove it from the oven and lower it into a fluidised bath. This allows the plastic powder to evenly coat the surface of the steel.
Now you can remove your component and hang it to cool.
There are plenty of options to choose from with metal finishes, so you should decide which is best for your metal item by thinking about what you want to use it for when it's finished.
Finishing plastic
There are a few things you can do to give a polished finish to any plastic component, no matter how it's been shaped or cut.
Before you get started, here are some of the things you're going to need:
A selection of files
A metal rule
A range of wet and dry paper
A wax polishing wheel and some wax
A blowtorch
Some hot work gloves, apron and goggles
And finally, a face shield
Like all abrasive processes, the idea is to start with more abrasive tools and materials, and then, step by step, use less abrasive techniques until you're happy with the finish.
Flatten rough edges by cross-filing. Push the file across and along the surface until its feels flat to touch.
Keep the file flat to the workbench to make sure the edges are square.
To file a curve, start with the file flat on one edge, then run it along the curve, finishing with it flat on the other edge.
At this stage, you will have marks from the filing which you should remove with a steel rule or scraper.
To get a good near-polished finish, you will now need to use wet and dry paper.
Wet the paper with a little water to reduce friction.
Start with a 280 grit, then move on to 600 grit, and finally 1200 grit.
Remember, that the higher the grit number, the finer the finish.
After this the surface should feel very smooth.
To achieve a high polish finish you now have two options.
The most common way is to use a wax polishing wheel and you'll need your goggles or face shield and gloves for this.
Apply the wax to the cloth wheel.
Then working from the centre towards the corners, use the machine to polish the edges.
Be careful here not to snag the cloth on the corners.
Re-apply the wax to the wheel every 30 seconds or so to avoid excessive friction which could melt the edges.
If you are polishing high impact polystyrene, you will need to take extra care. It has a much lower softening point than acrylic and so is more likely to melt with excessive friction.
Finally, remove any remaining wax with the polishing mop.
You can get a really clear glass-like finish by flame polishing your plastic edges.
For this process, you will need to put on your hot work protective gloves, apron and a face shield.
This option will only work for acrylic. Flame polishing cannot be used to finish high impact polystyrene.
We are using a blowtorch here but you can get the same result with a brazing torch or an oxy acetylene torch. It is a very quick and simple process and gives a great finish to your plastic.
Finishing wood
All wooden items and components have to be finished in order to seal and protect the surface of the wood.
Before you get started here are some things you're going to need:
Glass paper in a variety of grit sizes, a metal rule, a selection of wood oils with a cloth or sponge, some wax, wood stain, varnish or lacquer, and goggles and a dust-mask.
The process of finishing wood usually comes down to sanding and that can take longer than you think, so you'll need to be patient.
Like any abrasive process, sanding is about gradually removing smaller and smaller layers of the surface until it's completely smooth.
You'll need to do this in stages, using a few different types of glass paper of progressively finer grades.
Each stage removes the scratches left by the previous grades to give a smooth and even finish.
To start, get your dust-mask and goggles on and start smoothing with an 80 grit glass paper, then move on to a 120 grit, finally a 240 grit.
Remember to sand in the direction of the grain for a smooth finish. For larger flat surfaces you can get great results with an electric sander.
Now you've got a smooth finish you need to protect the wood, you could paint it, but you would lose the grain.
So here are three options that will protect and enhance the wood.
Wood oils, like teak oil, Danish oil or linseed oil, soak into and seal the wood, enhancing the grain.
You should apply oils directly to the wood with a cloth or sponge.
Wax will enhance the natural colour and grain of the wood and leave you with a satin or high-shine finish.
There are natural and chemical waxes, but both get the same result.
Applied with a soft cloth, or tissue, they are absorbed by the wood and, when they dry, they seal the grain against water or moisture.
And finally, you can stain the wood using a coloured, water-based stain to coat the surface. It soaks into the grain and then dries.
You should then seal the wood with a varnish or lacquer.
There are two types of varnish: water-based and chemical-based.
Water based varnishes are easiest to use, simply apply three coats, sanding between each one.
Test yourself
More on Manufacturing
Find out more by working through a topic
- count2 of 4

- count3 of 4
- count4 of 4